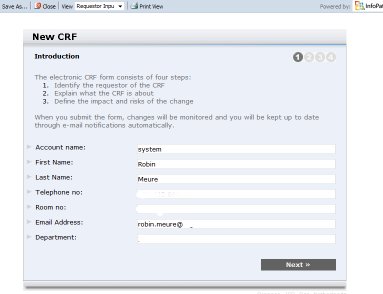
It's been a while since I lasted posted and there is a very good reason for it! I will save the reason for another post in the very near future but right now I wanted to share this webpart I've been working on. As the title suggests it's a webpart that views the content of an InfoPath form. Now it's not a webpart that just renders the xsn file (like the FormViewer webpart). No, what it does is displaying all the promoted columns of a particular submitted form.
The big question is ofcourse.. "Robin.. why on earth did you build this" Well it has something to do with posts I made in the past ((Approval) Workflow thingies continued & (Approval) workflow thingies) where I copied information from the promoted columns of the form into a tasklistitem. By doing this, an user can easily see what he/she needs to approve in just one or two click(s). Now I was getting tired to copy every promoted column by hand in SPD for each Action I created per step. So I decided to build a webpart which did the following :
- Show the promoted columns without specifying them per form
- Show headers to group columns
- Have the ability to Approve or Reject the form
- (optionally) show the approver which phase of the workflow status he/she is approving
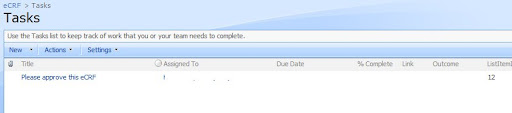
Now within defining the workflow in SPD, the only thing I need to copy each time into a new taskitem is the ID of the form and the person who must approve that step. The webpart takes care of the rest by using that information. How? Well you drag the webpart onto the 'editform.aspx' page of the task list. Using this page, it will give me the ID of the task (querystring in the URL) and by having both ID's (task and form) I can display and update the information.
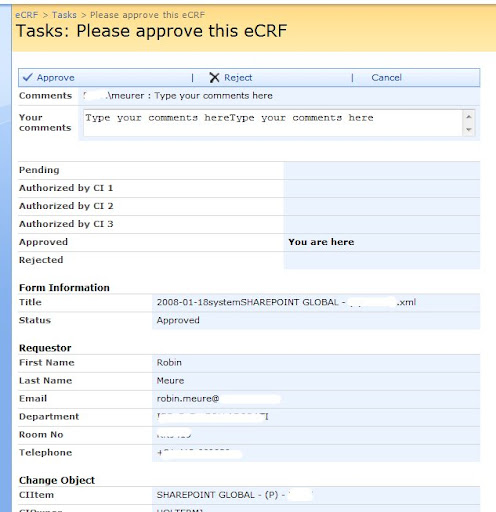
Now a screenshot tells you more than a lot of words so here's what it looks like:
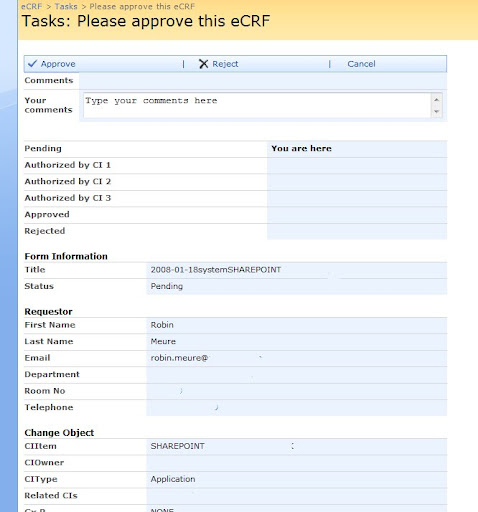
Pretty impresive eh? (I know I need to fix the layout;) .. Now the only input this webpart needs is the following :
- FormLibraryName, the name of the library where the information should be fetched from
- Name of a view, this view is being used to show the columns that you want to have in the webpart.
- TaskName, the name of the tasklist where the tasks are created for the workflow
- Headers, a comma separated string where you can specify where headers should be placed and what the title should be.
So how does the code look like? Well.. it's quite big so I will only post the relevant stuff.
- Hiding the default EditForm formfield
writer.Write("<style>#WebPartWPQ2{display:none;}</style>");
- Getting the reference of the taskitem and the formitem
SPWeb web = SPControl.GetContextWeb(Context);
SPList tasklist = web.Lists[_tasklist];
SPListItem taskitem = tasklist.GetItemById(Convert.ToInt32(Page.Request.QueryString["ID"]));

SPList formlist = web.Lists[_formlibrary];
SPListItem formitem = formlist.GetItemById(Convert.ToInt32(taskitem["ListItemID"].ToString()));
- Displaying the status of the workflow by using a column named "Status" in the formlibrary
SPFieldChoice status = (SPFieldChoice)formlist.Fields["Status"];
writer.Write("<table cellpaddin='0' cellspacing='0' width='100%'>");
foreach (string _status in status.Choices)
{
if (_status == formitem["Status"].ToString())
{
writer.Write("<tr><td class='ms-formlabel'>");
writer.Write(_status.ToString());
writer.Write("</td><td class='ms-formbody'>");
writer.Write("<b>You are here</b>");
writer.Write("</td></tr>");
}
else
{
writer.Write("<tr><td class='ms-formlabel'>");
writer.Write(_status.ToString());
writer.Write("</td><td class='ms-formbody'>");
writer.Write(" ");
writer.Write("</td></tr>");
}
}
writer.Write("</table>");
- Displaying all the columns based on a view. And when given, display a header
//Render the columns with their values based on the view that is selected
writer.Write("<table cellpaddin='0' cellspacing='0' width='100%'>");
SPView view = formlist.Views[_view];
System.Collections.Specialized.StringCollection strCollection = view.ViewFields.ToStringCollection();
for (int i = 0; i < strCollection.Count; i++)
{
try
{
//For all of the headers that are typed in the properties in "1;Header,2:Header2" way we add those headers.
try
{
string[] seperator;
char[] splitter = { ',' };
seperator = _separators.Split(splitter);
for (int x = 0; x < seperator.Length; x++)
{
string[] colom;
char[] _splitter = { ';' };
colom = seperator[x].Split(_splitter);
for (int y = 0; y < colom.Length; y++)
{
if (i == Convert.ToInt32(colom[0].ToString()))
{
writer.Write("<TR><td> </td></TR><tr><td style='font-family:verdana,arial,helvetica,sans-serif; font-size:9pt;font-weight:700;'>" + colom[1] + "</td></tr>");
}
break;
}
}
}
finally
{
//Write all the columns that are in the view with their values
writer.Write("<tr><td class='ms-formlabel'>");
if (formitem.Fields.GetFieldByInternalName(strCollection[i]).Title != null)
{
//ColumnName
writer.Write(formitem.Fields.GetFieldByInternalName(strCollection[i]).Title);
}
writer.Write("</td>");
writer.Write("<td class='ms-formbody'>");
if (formitem[(strCollection[i])] != null)
{
//ColumnValue
writer.Write(formitem[(strCollection[i])].ToString());
}
writer.Write("</td></tr>");
}
}
catch (Exception error)
{
writer.Write(error.Message.ToString());
}
}
writer.Write("</table>");
The other code just renders the webpart properties, controls and handles the click events of the buttons.. no real rocket science there ;)